This section describes how to navigate the Diagnostics interface and select test options.
Diagnostics Screen Layout
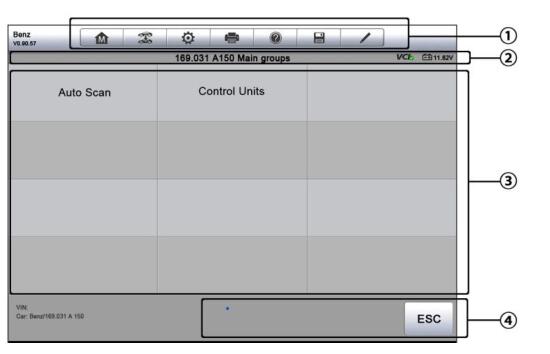
The Diagnostics screens typically include four sections.

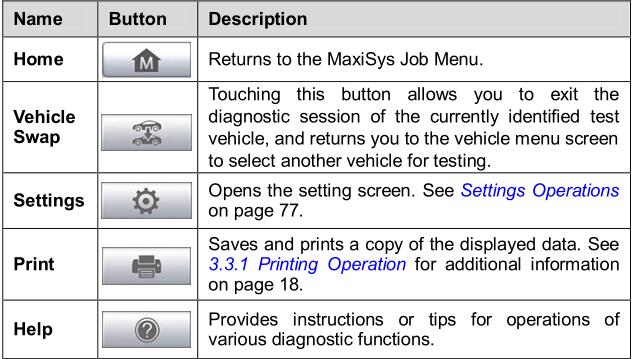
1. Diagnostics Toolbar
2. Status Information Bar
3. Main Section
4. Functional Buttons
Diagnostics Toolbar
The Maxisys toolbar contains a number of buttons that allow you to print or save the displayed data and make other controls. The table below provides a brief description for the operations of the Diagnostics toolbar buttons:


To perform data printing in Diagnostics
1. Tap the Diagnostics application button from the MaxiSys Job Menu. The Print button on the diagnostic toolbar is available throughout the whole Diagnostics operations.
2. Tap Print whenever you want to make a printing. A drop-down menu appears.
a) Print This Page – prints a screenshot copy of the current screen
b) Print All Page – prints a PDF copy of all displayed data
3. A temporary file will be created and sent to the computer for printing.
4. When the file is transferred successfully, a confirmation message
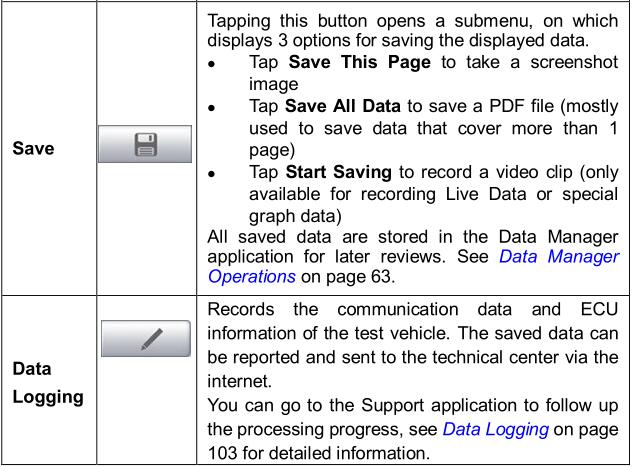
To submit Data Logging reports in Diagnostics
1. Tap the Autel Maxisys Elite application button from the MaxiSys Job Menu. The Data Logging button on the diagnostic toolbar is available throughout the whole Diagnostics operations.
2. Tap the Data Logging button whenever you want to commit recording for the system communication data. The button displays blue during the active recording process.
3. Tap the button again to finish recording. A submission form will display to let you fill in the report information.
4. Tap the Send button to submit the report form via the internet, a confirmation message displays when sending is successful.
Status Information Bar
The Status Information Bar at the top of the Main Section displays the following items:
1. Menu Title – indicates the menu subject of the Main Section
2. VCI Icon – indicates the communication status between the tablet and the VCI device
3. Battery Icon – indicates the battery status of the VEHICLE Main Section
The Main Section of the screen varies depending on the stage of operations. The main section can show vehicle identification selections, the main menu, test data, messages, instructions and other diagnostic information.
Functional Buttons
The displayed Functional Buttons at this section of the screen varies depending on the stage of operations. They can be used to navigate, save or clear the diagnostic data, exit scanning as well as make other functional controls. The functions of these OBD2 scan tool will be introduced respectively in the following sections of the corresponding test operations.
Screen Messages
Screen messages appear when additional input is needed before proceeding.
There are mainly three types of on-screen messages as to their purposes:Confirmation, Warning, and Error.
Confirmation Messages
This type of messages usually displays as an ―Information‖ screen, which informs you when you are about to perform an action that cannot be reversed or when an action has been initiated and your confirmation is needed to continue.
When a user-response is not required to continue, the message displays briefly before automatically disappearing.
Diagnostics Screen Layout
The Diagnostics screens typically include four sections.
1. Diagnostics Toolbar
2. Status Information Bar
3. Main Section
4. Functional Buttons
Diagnostics Toolbar
The Maxisys toolbar contains a number of buttons that allow you to print or save the displayed data and make other controls. The table below provides a brief description for the operations of the Diagnostics toolbar buttons:

To perform data printing in Diagnostics
1. Tap the Diagnostics application button from the MaxiSys Job Menu. The Print button on the diagnostic toolbar is available throughout the whole Diagnostics operations.
2. Tap Print whenever you want to make a printing. A drop-down menu appears.
a) Print This Page – prints a screenshot copy of the current screen
b) Print All Page – prints a PDF copy of all displayed data
3. A temporary file will be created and sent to the computer for printing.
4. When the file is transferred successfully, a confirmation message
To submit Data Logging reports in Diagnostics
1. Tap the Autel Maxisys Elite application button from the MaxiSys Job Menu. The Data Logging button on the diagnostic toolbar is available throughout the whole Diagnostics operations.
2. Tap the Data Logging button whenever you want to commit recording for the system communication data. The button displays blue during the active recording process.
3. Tap the button again to finish recording. A submission form will display to let you fill in the report information.
4. Tap the Send button to submit the report form via the internet, a confirmation message displays when sending is successful.
Status Information Bar
The Status Information Bar at the top of the Main Section displays the following items:
1. Menu Title – indicates the menu subject of the Main Section
2. VCI Icon – indicates the communication status between the tablet and the VCI device
3. Battery Icon – indicates the battery status of the VEHICLE Main Section
The Main Section of the screen varies depending on the stage of operations. The main section can show vehicle identification selections, the main menu, test data, messages, instructions and other diagnostic information.
Functional Buttons
The displayed Functional Buttons at this section of the screen varies depending on the stage of operations. They can be used to navigate, save or clear the diagnostic data, exit scanning as well as make other functional controls. The functions of these OBD2 scan tool will be introduced respectively in the following sections of the corresponding test operations.
Screen Messages
Screen messages appear when additional input is needed before proceeding.
There are mainly three types of on-screen messages as to their purposes:Confirmation, Warning, and Error.
Confirmation Messages
This type of messages usually displays as an ―Information‖ screen, which informs you when you are about to perform an action that cannot be reversed or when an action has been initiated and your confirmation is needed to continue.
When a user-response is not required to continue, the message displays briefly before automatically disappearing.
Comments
Post a Comment